


Documentation
- CollectiveAccess
- Creating Object Records in CollectiveAccess
- Creating Entity Records in CollectiveAccess
CollectiveAccess
Summary
- Resolve the 21 collision clusters via physical survey. Assign final identifiers to the 68 affected records.
- Remove 68 affected records to second sheet.
- Build the data model in CA: object type list, metadata elements, entity relationship types.
- Build the vocabulary lists in CA:
admc_material_category(hierarchical) andadmc_material_terms(flat), built from cleaned and merged DSpace subject fields. - Build the storage location hierarchy in CA.
- Pre-process the export: parse
dc.descriptioninto holdings flags, split subject strings on||, map rights to access values, load your newidnocolumn. - Write the import mapping: two passes, entities first then objects.
- Test import on a 20-record slice. Iterate.
- Production import of the 310 clean records.
- Import the 68 collision records after physical survey.
- Establish media naming convention for future digitisation; no media ingest yet.
Data model → Lists/vocabularies → Import mapping → Test import → Production import → Media (later)
Resources
https://camanual.whirl-i-gig.com/providence/
https://manual.collectiveaccess.org/providence/user/editihttps://camanual.whirl-i-gig.com/providence/user/dataModelling/listsAuthoritiesng/lists_and_vocab.html
https://manual.collectiveaccess.org/providence/user/dataModelling/primaryTables.html
Primary tables
CA is structured around several primary tables, with editors that can be enabled or disabled depending on project requirements. The ones most relevant to the ADMC:
| Table | What it holds |
|---|---|
ca_objects |
The physical or born-digital items themselves |
ca_object_lots |
Accession events grouping multiple objects acquired together |
ca_entities |
People and organisations (creators, donors, manufacturers) |
ca_collections |
Intellectual groupings of objects (series, fonds, donor collections) |
ca_storage_locations |
A hierarchical map of physical storage |
ca_places |
Geographic locations (hierarchical, linkable to GeoNames) |
ca_occurrences |
Flexible: events, exhibitions, publications, activities |
ca_loans |
Outgoing or incoming loan records |
ca_movements |
Optional: object movement history |
An object record does not contain the entity's name as a text string. It contains a relationship to a separate entity record. This is the relational model in practice. If "Hansgrohe AG" is a manufacturer of 40 objects in the ADMC, there is one entity record for Hansgrohe, and 40 relationships from 40 objects to that record. Correct it once; it updates everywhere.
Metadata elements to create (or verify)
| CA element code | Maps from | Data type | Notes |
|---|---|---|---|
admc_idno_legacy |
dc.identifier.other |
Text | Preserve the old location code as a legacy field, non-searchable by default |
admc_description |
dc.description (substantive only) |
Text (long) | Only for the ~20 records with real text |
admc_physical_holdings |
dc.description (parsed) |
List (multi-value) | "Sample available," "Booklet available" as checkboxes |
admc_manufacturer_url |
dc.publisher.uri |
URL | Product page; can also live on the entity record |
admc_subject_classification |
dc.subject.classification |
List (hierarchical) | See vocabulary design below |
admc_dspace_handle |
dc.identifier.uri |
URL | Preserve the DSpace handle for provenance |
admc_intake_year |
dc.date.issued |
Text or Date | Record the upload year if at all; do not call it "date issued" |
VRA Core fields that should already exist and need no new elements: title (preferred_labels), dimensions, material, technique, condition.
Sandbox -- AS
Task 2: Build the data model
Notes - 9 June
- Relationship Types:
- Entity to collection: For ADMC, this can be the manufacturer to the objects. Related to option already included.
- Entity to place: Includes built by, owned by, resided at, born at and worked at. (Would built by work best if place is to be included?)
- Object to place: Includes depicts, describes, was created at and was located at. (Does created at works best for ADMC?)
- Object types:
- Default of Works, can customize to different categories specific for ADMC like Physical Objects (ex. samples) and Other (ex. catalogs)
- They are all listed as physical objects in DSpace, but are there are differences between a pack of fabric samples and a pricelist catalog when it comes to specifics in the metadata?
- Default of Works, can customize to different categories specific for ADMC like Physical Objects (ex. samples) and Other (ex. catalogs)
- Term and Vocabulary:
- CollectiveAccess already includes Getty's Art & Architecture vocab list
- Or, customize using the terms from the subjects columns in DSpace
- Linking different subjects to a single object (ex. Walls, Metal): terms taken from dc.subject column, CollectiveAccess has the ability to use Library of Congress Subject Headings (Probably not using if taking from present subject terms? Cannot find LCSH in list/vocabulary page)
- In List/Vocabulary List:
- Subject (term) for Topics: conceptTopic or descriptiveTopic included, or customized with ADMC terms
- Object label types: cannot find much related to labels on CollectiveAccess website, many sub-categories already present but does not seem to be related to subjects?
- In Relationship List:
- Object to vocabulary term: includes depicts or is described by sub-categories (Would these work for subjects? Since some objects use the subject to describe what the object is made of? Would that be depicting?)
- How does the process of creating these relationships work? Would this process include first creating a list of vocab related to the ADMC, then putting the terms in the record/object metadata? Would this process automatically link the object to these terms, or would a relationship have to be manually created?
- Object to vocabulary term: includes depicts or is described by sub-categories (Would these work for subjects? Since some objects use the subject to describe what the object is made of? Would that be depicting?)
- In List/Vocabulary List:
- Metadata elements to possible include: Object representations (can just be a media file, would this have to be included when creating records with images available?)
- Additional questions: Will dc.subject.other be included in the metadata as well? (dc.subject.classification already listed as to be created). Some records don't include dc.subject, but do include subject.classification or subject.other, does the level of subject matter depending on the record?
Notes - 10 June
- Creating entities:
- Corporate entity - before any editing
- The only requirements is an entity identifier (should this follow the same format as the object identifiers?)
- Preferred labels include Forename, Surname, etc. (should this be edited to better fit the need of the entities, since they will mostly be corporations, not individual people?)
- Vocab, refid, Attribution, Culture, Dates and Role Set
- Corporate entity - possible customization
- List and Vocabulary: entity types, Corporate (org)
- Entity class (can chose between Individual person, Organization and Individual person without additional forenames). Would choosing Organization work best?
- https://support.collectiveaccess.org/d/301869-entity-types
- List and Vocabulary: entity types, Corporate (org)
- Corporate entity - before any editing
- Enabling Getty Art & Architecture Thesaurus
- https://support.collectiveaccess.org/d/301886-enabling-gettys-art-architecture-thesaurus-aat-vocabulary
- Add metadata element, "informationService" as the type, AAT as the service, "aat_vocabulary" as element code, follow same restriction as Library of Congress Subject Headings - done.
- Questions: How to enable Getty to UI usage after adding metadata element? Will this then allow for fields to be added to records (object, entity, etc.)? Does a field for this need to be added (like how a metadata field for the Library of Congress Subject Headings is included in an object record)?
- Seems to be available to search under subjects when editing an object record, but searches for terms that are on the Getty website (https://www.getty.edu/research/tools/vocabularies/aat/) yield no results in CollectiveAccess. Still marked as disabled under Lists & Vocabulary.
- Other issues
- Uploading images to media object records
- Able to upload a test image (downloaded from a different object record from DSpace as a test image) to the object record. Successfully uploaded and able to view through this interface and marked as "accessible to public". However, the image is not viewable through the public interface. When downloading the file, it says that the format is unsupported or corrupted.
- Uploading images to media object records
Notes - 6 July
- Batch editing - must create a Set first
Notes - 8 July
- Making customized metadata fields present in Pawtucket
- Have to first customize the theme for the Pawtucket site:
- https://pawtucket2.readthedocs.io/en/latest/pawtucket/themes/defining.html
- Seems to be specifically editing the Configuration Files that will allow for customizing specific metadata fields in object records: https://pawtucket2.readthedocs.io/en/latest/pawtucket/themes/conf.html
- app.conf: https://pawtucket2.readthedocs.io/en/latest/pawtucket/general/app.html
- Add the element code for the metadata fields in the ca_objects_detail_display_attributes: https://support.collectiveaccess.org/d/471-471
- Maybe also in detail pages - detail.conf: https://pawtucket2.readthedocs.io/en/latest/pawtucket/detail/detail.html
- app.conf: https://pawtucket2.readthedocs.io/en/latest/pawtucket/general/app.html
- From Pawtucket help page forum:
- Have to first customize the theme for the Pawtucket site:
Creating Object Records in CollectiveAccess
Accessing Providence
CollectiveAccess has two interfaces, Providence and Pawtucket. Providence is for admin and Pawtucket is for the public. The URL for the ADMC’s Providence site is https://library.berlin-international.de/collections/admin. Once logging in, you will be able to create and edit object and entity records.
Before you begin
Checking Entity Records
Every object record must be linked to an entity record of its manufacturer. To prevent duplicate entity records from being created, first check if the manufacturer already has an entity record in the system. Follow the instructions in the "Creating Entity Records in CollectiveAccess" article for searching and creating entity records before creating an object record.
Identifier
The format for object identifiers is YYYY.2.NNN. The unique identifier for a new object record is determined by the highest existing identifier for the current year in CA.
Finding the highest existing identifier:
- Go to Find in the menu, then click Objects in the dropdown. This will take you to the Basic Search for all object records in CA.
-
In the list view of all object records, there will be a column titled Object identifier. Click on the title to sort the records by their identifier. Higher identifiers will be at the top of the list.
- Once you have determined what the highest existing identifier in use is, use the next number in the sequence for the new object record. For example, if the highest existing identifier is 2026.2.15, the next identifier will be 2026.2.16.
Accessing the object record editor
To create a new object record in the system, go to New, then Object in the dropdown. Choose the object type that best fits the item you are cataloging.
Object types
For the ADMC there are three different object types: Physical Sample, Publication and Sample with Publication. To decide which object type applies to the item you are cataloging, assess it based on these criteria:
- Physical Sample - a physical object, often a product sample, that does not have an associated publication in the collection.
- Publication - a product catalogue or similar publication that does not have an associated physical object in the collection.
- Sample with Publication - an item that includes both a physical object and an associated item catalogue or similar publication, often housed in the same container.
Once you have chosen one of these object types, a new object record will be created.
Required fields
Every object record must include the following field before it can be saved:
- Identifier
- Title (preferred label) - from the manufacturer or a descriptive title of the object. When creating a title, make sure that it will be clear for patrons when searching or browsing the collection to know what the object is without looking at additional metadata fields. Titles should not have too little or too much information.
Recommended fields
These fields are not required for a record to be saved, but should be filled out if available as they contain important information related to workflow management, public accessibility and specifics for the ADMC:
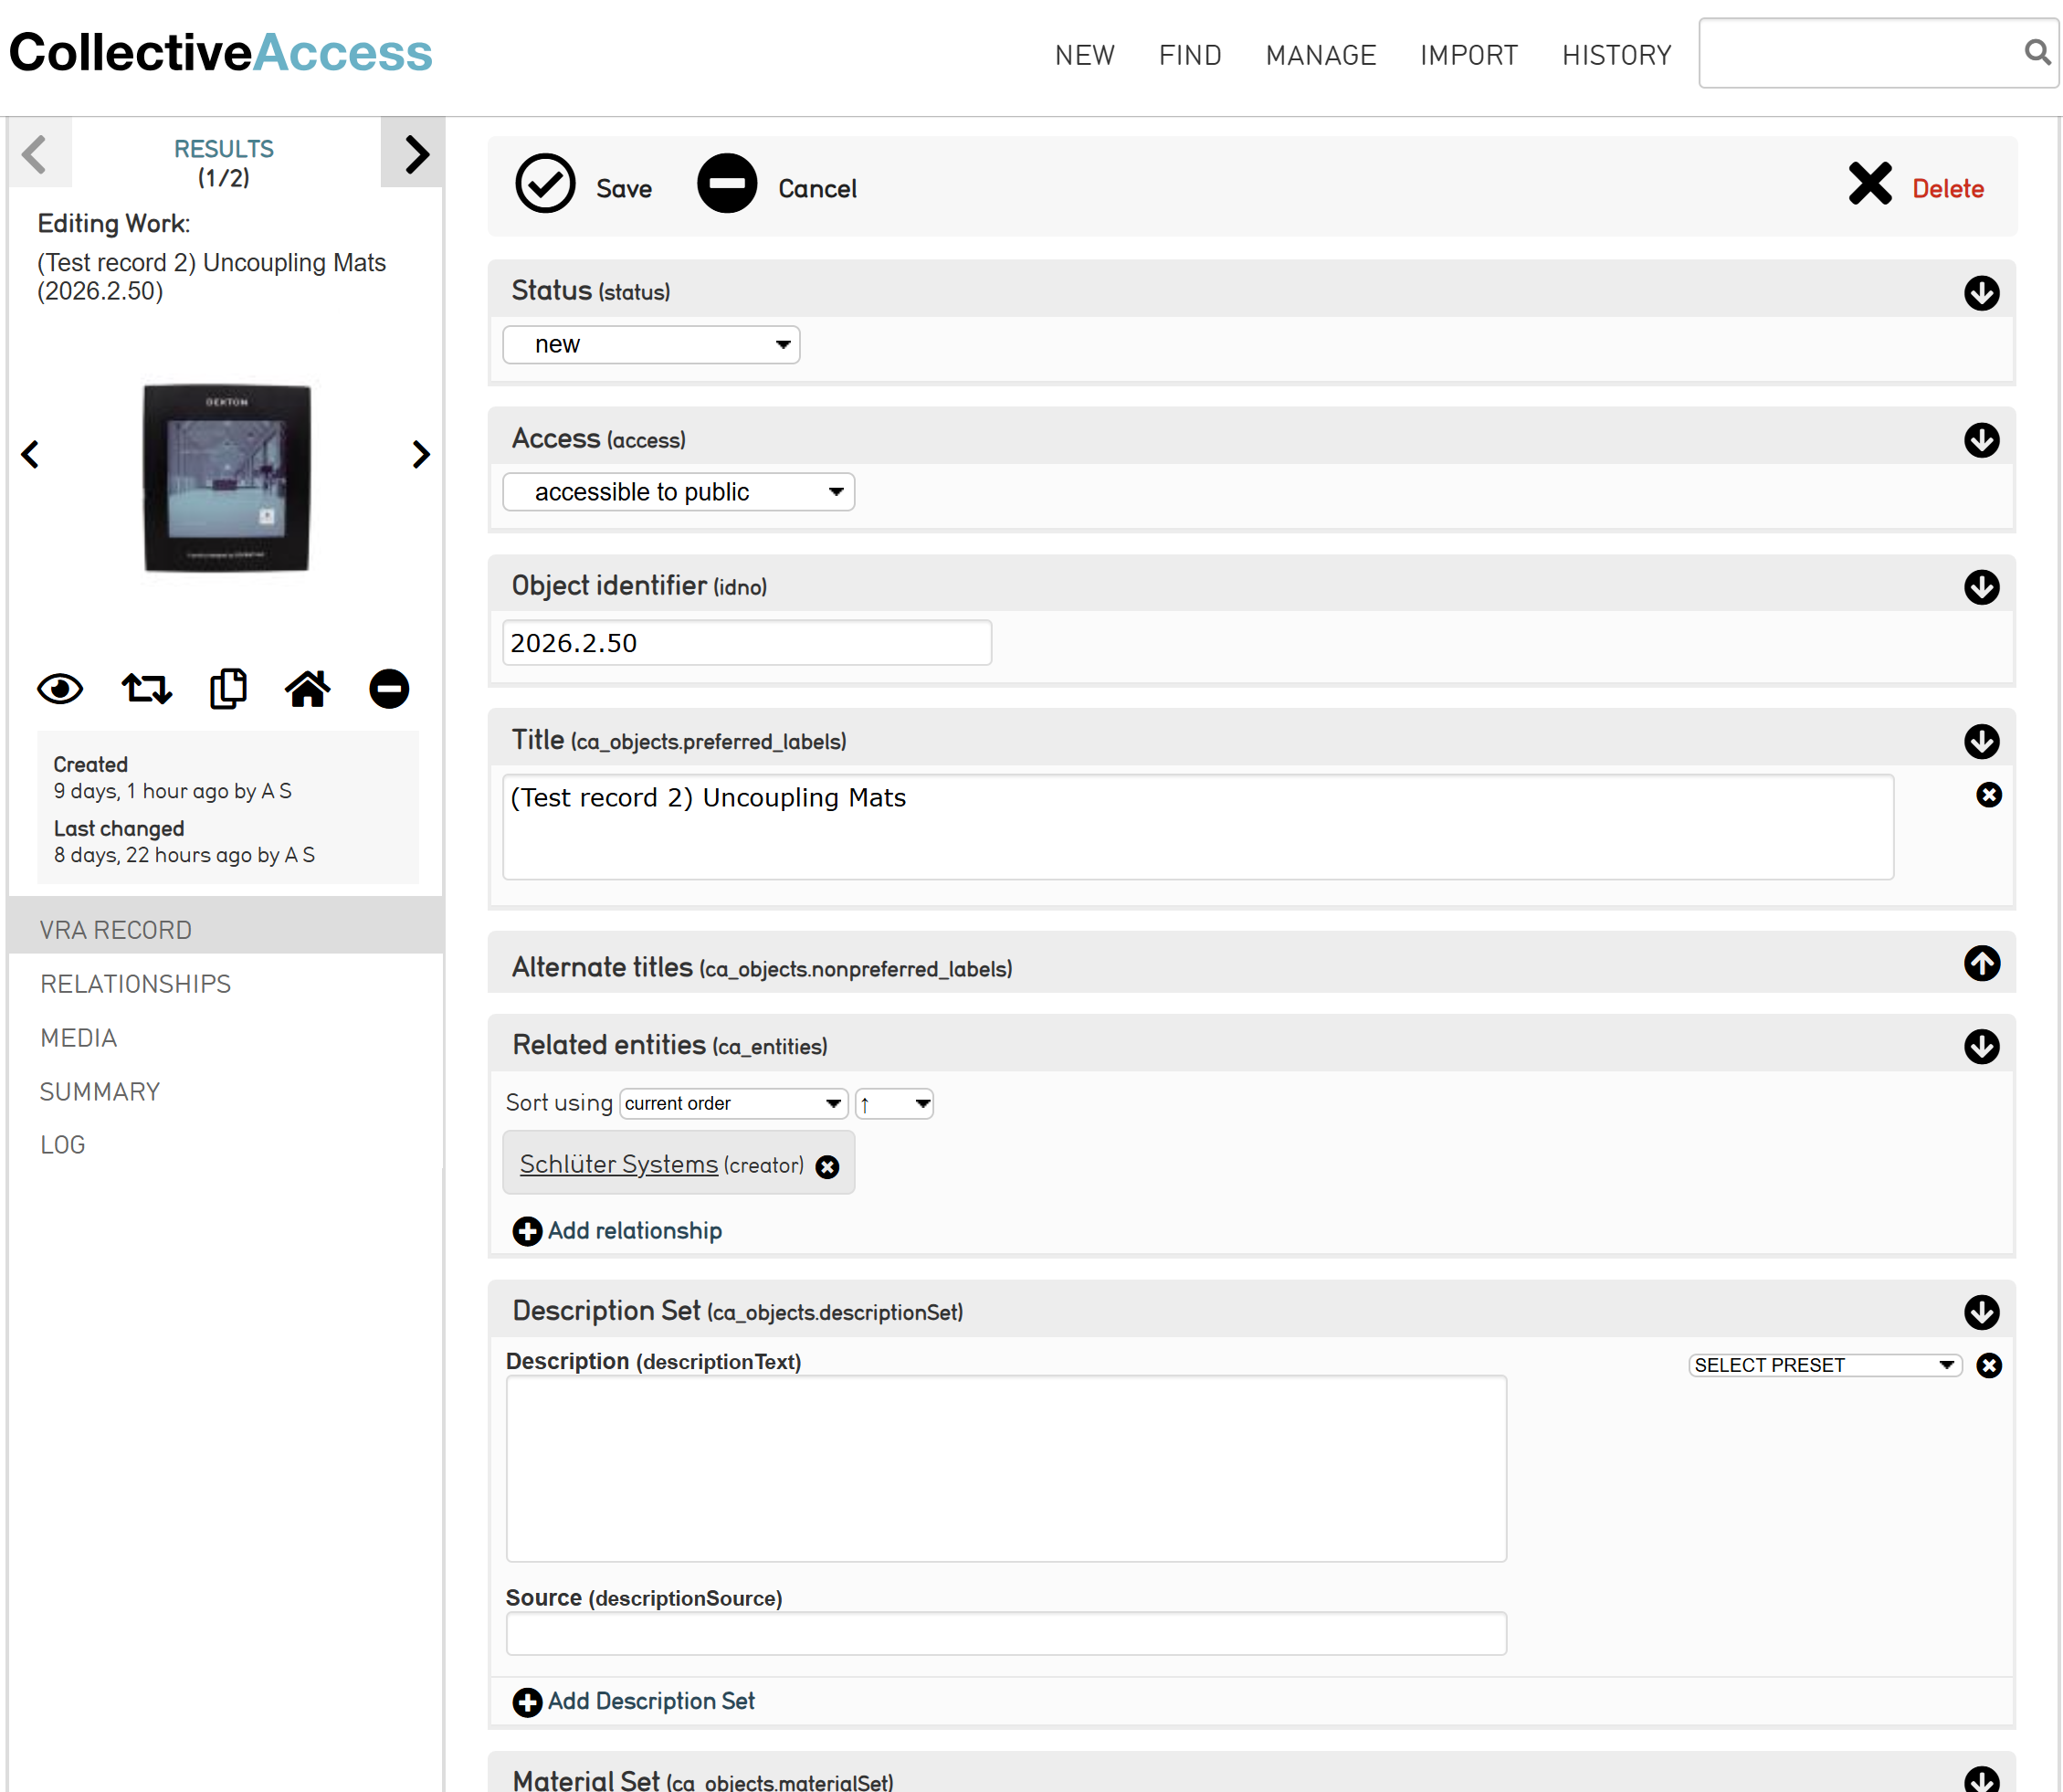
- Status - tracks the completion status of the object record. When creating a new record, leave the status as “new.” When done editing, change the status to “editing complete.”
- Access - determines the access status of the record. Options are “accessible to public,” “not accessible to public” and “restricted public access.” If the object is intended to be visible to the public, choose the “accessible to public” status when editing is complete.
- Material type - records the material that the object is made out of. Choose the type(s) from the authority list.
- Application - records the intended usage of the object. Choose the application(s) from the authority list.
- Material properties - descriptive terms for the object. Check the properties from the list.
- Use Context - records the intended context for the object. Options are exterior, interior or both.
- Storage location - links to the object’s position on the shelf.
- Related entities - links to the manufacturer's entity record. Use the search bar in this field to find the entity and choose from the authority list to create the relationship between the two records.
- Description - additional information about the object, which is relevant for the public. This can include the manufacturer's description of an object, material specifics, etc. This field will be accessible to the public.
- Notes - other information related to the object, which is not a full description of the object. This can include folder or box numbers. This field will be accessible to the public.
- Internal Notes - used for questions or comments about information in the record while editing. This can include questions over the title, description, etc. This field is not accessible to the public.
Saving and checking
Once you are done editing the object record, save the record by clicking the save button at the top or bottom of the record.
If the object is intended to be accessible to the public, verify that the object shows up correctly in Pawtucket. Go to https://library.berlin-international.de/collections. Find the object using the search bar, Browse or Advanced Search on the menu. Once found, ensure that the public can view the object, its title, identifier, related entity and any relevant fields.
Images
If the item you are cataloging has images associated with it, these images can be attached to the object record:
- Before any images can be uploaded, the object record must first be created and saved.
- You will then have access to the Media tab on the left-hand column of the object record editor.
- From here you can upload images to the object record.
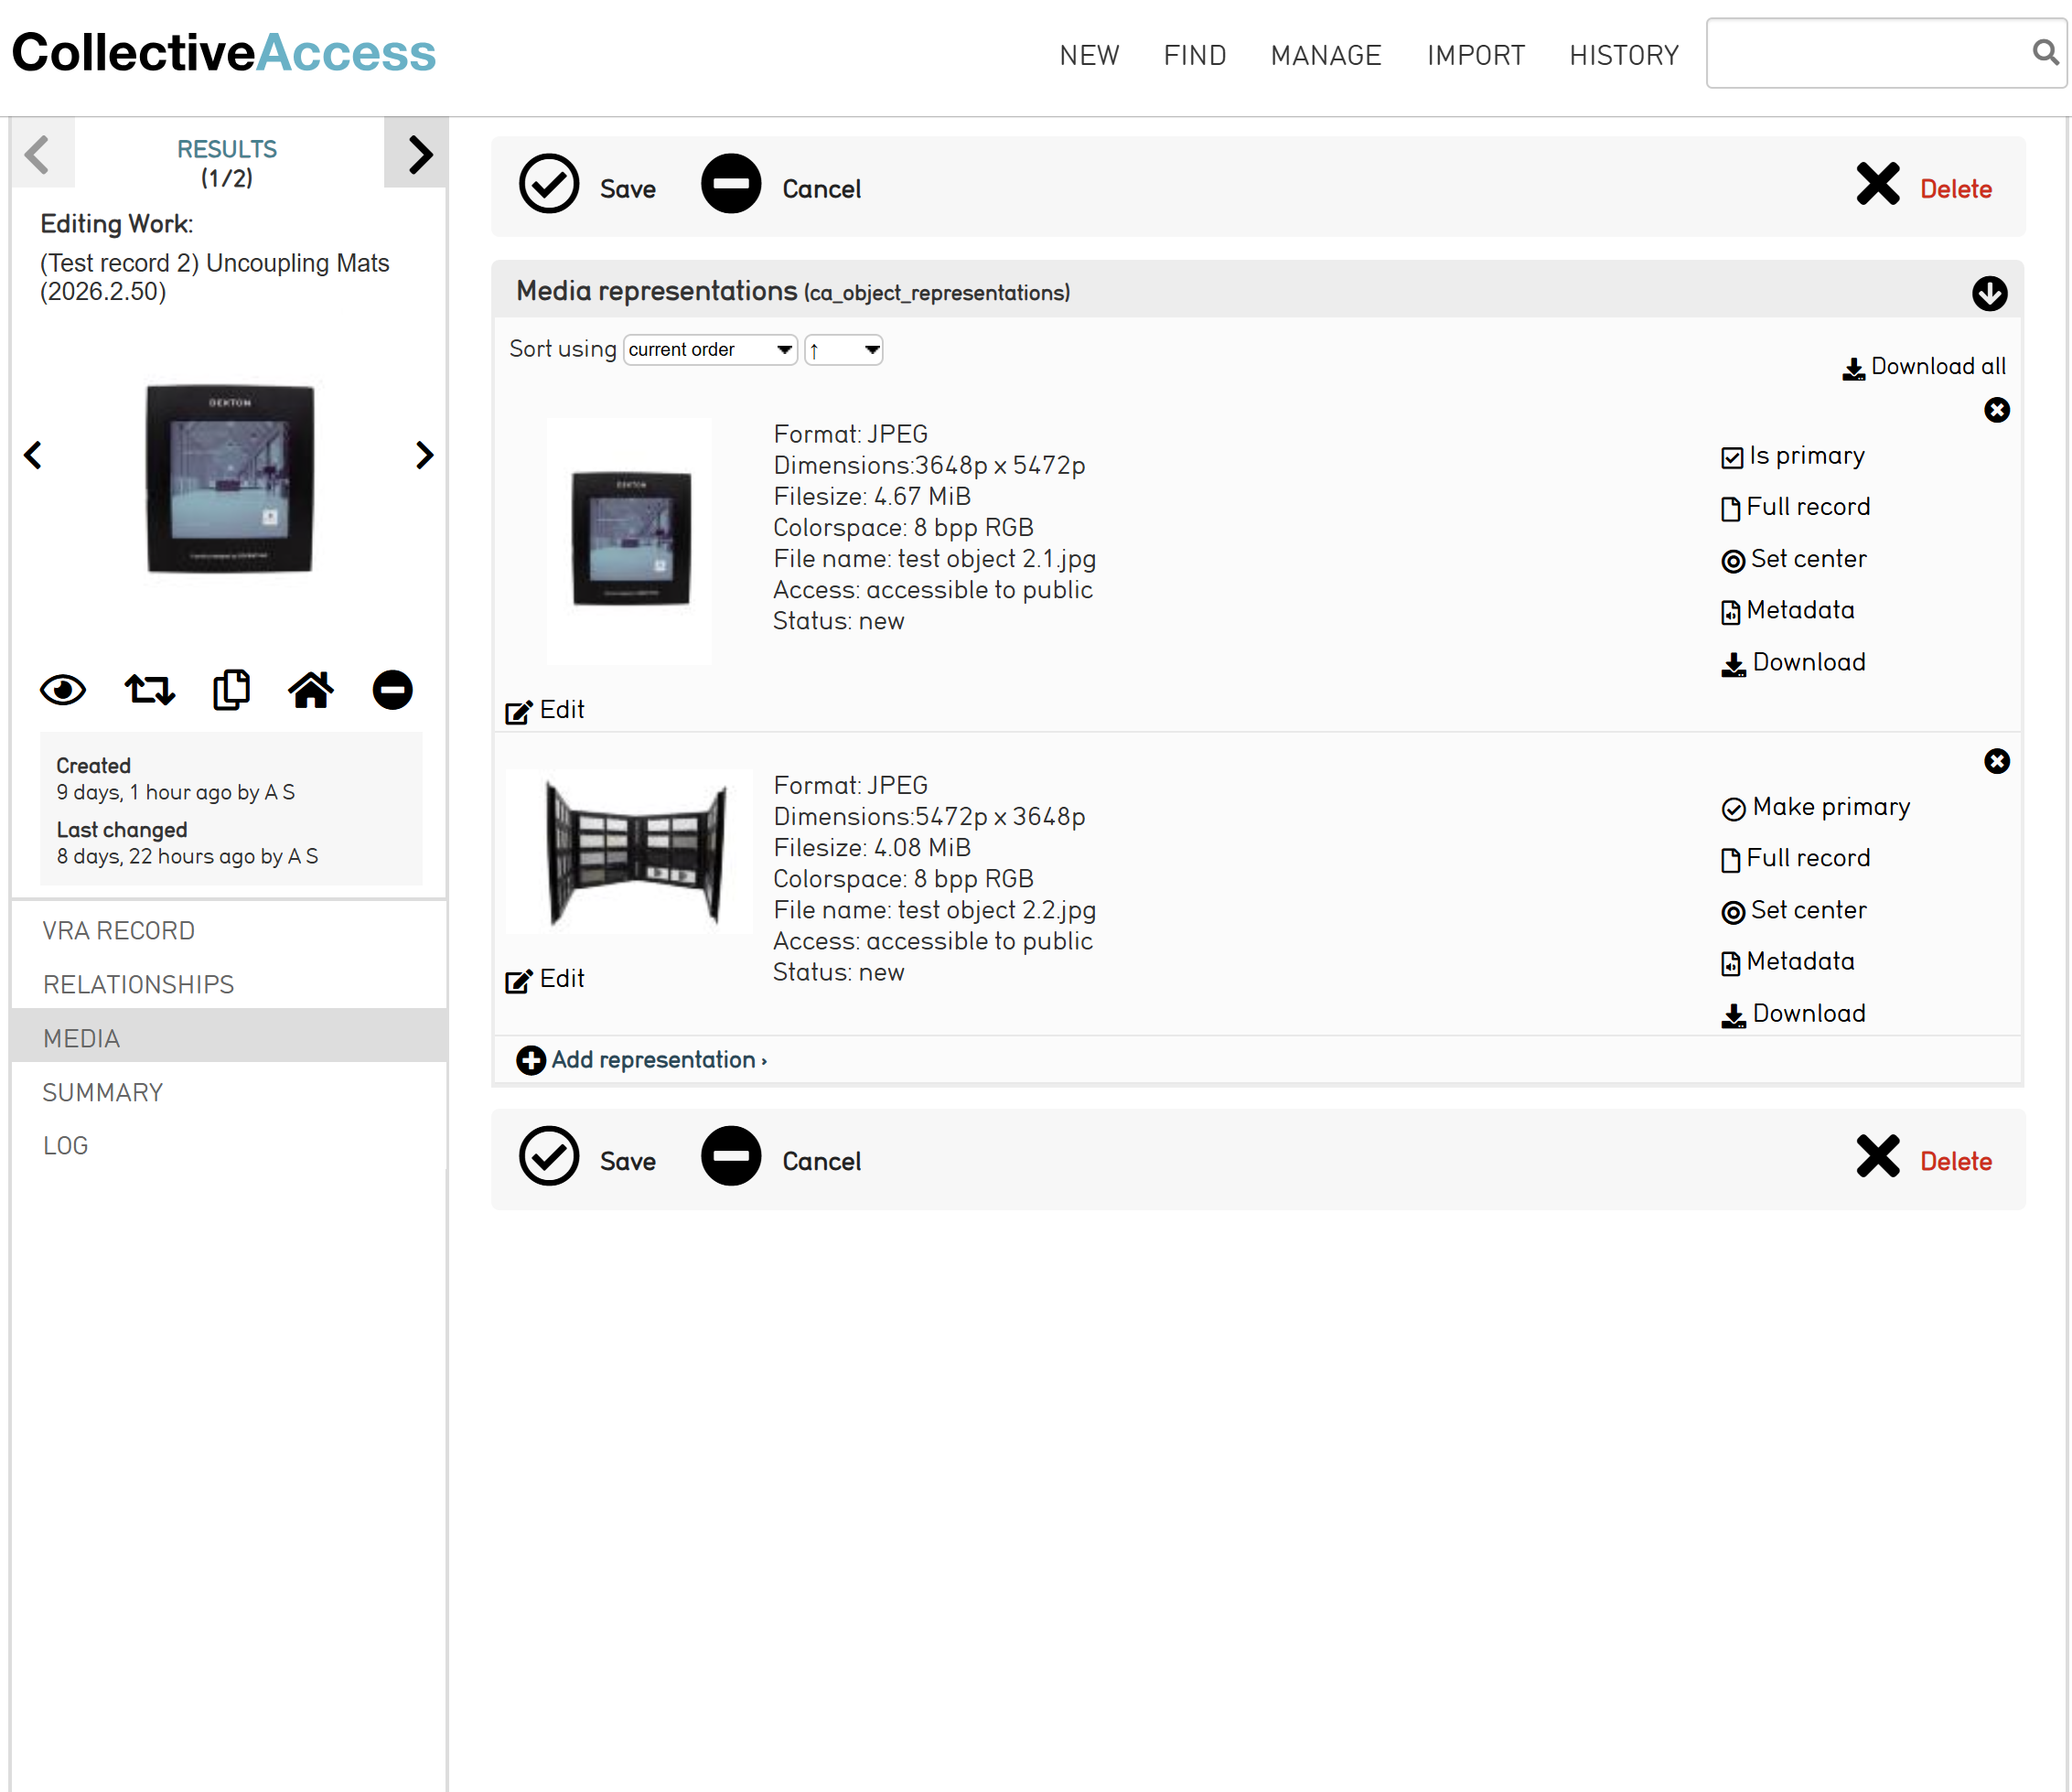
- To add more than one image, click on “Add representation” at the bottom of the field.
- To ensure that the images will be visible to the public, you must change the access field for each image to “accessible to public.”
-
Save changes.
Once images have been uploaded and processed in CA, you can change which image is primary, meaning which image will appear first in the object’s image carousel in Pawtucket:
- Under the Media tab, you will find a right-hand column next to the different media representation files.
- Click “Make primary” from the column on the image you wish to change.
-
Under the image you clicked, it will be noted that the chosen image “Will be primary after save.”
- Save changes.
Once images are uploaded and saved to the object record, check on Pawtucket to ensure that the images are visible to the public in the intended order.
Common Mistakes
Follow the directions above as you create a new record to prevent the most common mistakes:
- Not searching for an entity record before creating a new one, causing a duplicate record to be made.
- Not switching the access setting for an object record and its associated images to public once an object is ready for public view.
Creating Entity Records in CollectiveAccess
Before you begin
Search first
Before creating a new entity record, you must search in CA to see if an entity record already exists for the manufacturer:
- To go Find in the menu, then click on Entities in the dropdown. This will take you to the Basic Search for all entity records in CA.
- If an entity record already exists, do not create a new record. Search for it in the Related entities field when creating an object record.
The search-first rule ensures that duplicate entity records are not created. It is easier to prevent duplicate entity records than it is to fix them after they are made.
When to create
If after searching already present entity records in CA you find that a record for a manufacturer does not exist, you can create a new record.
Identifier
The format for entity identifiers is YYYY.1.NNN. The unique identifier for a new entity record is determined by the highest existing identifier for the current year in CA.
Finding the highest existing identifier:
- Go to Find in the menu, then click Entities in the dropdown. This will take you to the Basic Search for all entity records in CA.
- In the list view of all entity records, there will be a column titled Entity identifier. Click on the title to sort the records by the identifier. Higher identifiers will be at the top of the list.
- Once you have determined what the highest existing identifier in use is, use the next number in the sequence for the new entity record. For example, if the highest existing identifier is 2026.1.15, the next identifier will be 2026.1.16.
Accessing the entity record editor
To create a new entity record in the system, go to New, then Entity in the dropdown. There will be further options for entity types.
Entity type
The entity types available are Corporate, Family, Other and Personal. Choose Corporate, as this will identify the record as an organization rather than an individual. Once chosen, a new entity record will be created.
Required fields
Every entity record must include the following fields before it can be saved:
- Identifier
- Display name (preferred label) - the manufacturer's name as it appears on its website. Do not add the legal form (GmBH, KG, etc.).
Recommended fields
- Status - tracks the completion status of the object record. When creating a new record, leave the status as “new.” When done editing, change the status to “editing complete.”
- Access setting - determines the access status of the record. Options are “accessible to public,” “not accessible to public” and “restricted public access.” If the record is intended to be available to the public, ensure that the object has the “accessible to public” status chosen after editing.
- Description - description of the manufacturer. This field will be accessible to the public.
- Internal Notes - additional information about the manufacturer, including a change in name or ownership.
Email address
Another recommended field to include in an entity record is the email address of the manufacturer's website. The address should be the homepage of their website, not the page for any specific products or collections held in the ADMC. For the address, include:
- Only the base URL, anything beyond is too fragile and could become broken in the future.
- No trailing slashes.
- https:// at the beginning.
To access the email address field:
- First save the new entity record.
- You will then have access to the Contact Info tab on the left-hand column of the entity record editor.
- Record the information in the Email address field.
- Save changes.
Saving and verifying
Once you are done editing the entity record, save the record by clicking the save button at the top or bottom of the record.
To verify that the entity record was saved correctly, create a new object record and test if you are able to find the entity in the Related entities search bar. If you cannot find the new entity, it might not have been completed correctly.